How to Navigate Japanese Public Transportation
The first time traveling to Japan can be over whelming trying to navigate the public transportation system. However, Japanese public transportation is arguably the best in the world and after reading this guide you will feel confident in navigating. I did not get into a car my entire 10-day trip across the highlights of Japan. I was able to do everything and get everywhere by walking and train. Japanese public transportation is symbolic of Japanese culture; punctual, respectful, and efficient.
Let’s start with an overview and some Japan rail etiquette. There are 4 necessary items to successfully navigating Japanese public transportation; Japan Rail Pass, Suica card, Google Maps App, and Japan Official Travel App- I’ll go over these in detail below. Japan is extremely well connected and it’s public transportation infrastructure is probably the best in the world. The world famous bullet trains(Shinkansen) are the quintessential Japanese experience and you can cover a lot of distance in a short period of time. I only had 10 days and was able to see 4 different cities with 2 day trips. The basic Japanese rail etiquette is no eating or talking on your phone and give up your seat to the elderly. Just do as the locals are doing and you’ll blend in quietly. On a long distance train ride it is okay to eat and they sell food and beer on the trains. It is pretty surreal to ride the trains in Tokyo during rush hour and it’s slammed with passengers but you could still hear a pin drop. Think of a train ride in India and picture the exact opposite and that would be an idea of a Japanese train. I digress…
Views on the bullet train from Tokyo to Kyoto
4 Necessary items to Navigate:
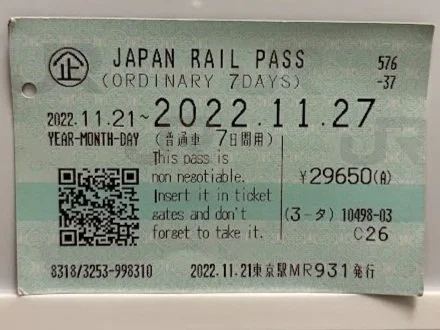
1.) Japan Rail Pass: Is a rail pass that comes in 7, 14, & 21 day duration. Important note; it is based on calendar days, so if you activate your 7 day card on Monday at 10 pm it will expire the next Sunday at Midnight, instead of expiring on the next Monday at 10 pm. These are very useful and worth it if you are traveling to more than two or three destinations in Japan. The JR pass is valid on all trains, monorails, buses, and ferries operated by Japan Railways Group. You are probably asking “how do I know what’s operated by Japan Railways Group and what’s not”?! Don’t worry keep reading it will come to fruition. You can use your JR pass on about 85% of your transportation if you plan correctly. It is also super convenient to just swipe your card at the ticket kiosk instead of having to individually buy tickets. You need to buy your card in advance (I recommend about two weeks out from your trip) from the japanrailpass.net website and it’s very easy. Then they will ship to you in 2 business days. If you wait to buy in person it will be more expensive. You can then activate your card whenever you want at a JR pass information center within the train stations. I waited to activate my 7 day JR pass until my third day in Tokyo because I had 10 total days and the majority of my train journeys took place on the last 7 days. After reading this article you will be strategic enough to know the best time to activate your card. Once you activate the clock is ticking and you can only use for consecutive days following activation. The flexibility, ease of use, and access to bullet trains make the JR pass a necessary item for traveling Japan.
See cost breakdown above. I bought a 7 day ordinary pass for 29650 Yen plus a 1 Euro booking fee for a total of 201 Euro’s at the time(Nov 2022- Yen was relatively weak at the time and Japan was just opening back from Covid) Do not bother with a Green pass Ordinary is comfy and the difference is minimal and not worth the extra cost.
I used JR pass for a day trip to Mt. Takao from Tokyo, most of my local rides around Tokyo, Tokyo to Kyoto (Shinkansen), Kyoto to Arashiyama roundtrip, Kyoto to Osaka, Osaka to Kawasaki(Shinkansen), and Kawasaki to Haneda Airport in Tokyo. When roughly running the numbers I probably only saved about $35 USD by using JR pass opposed to individually booking all tickets. However, the ease of having the JR pass was worth it alone
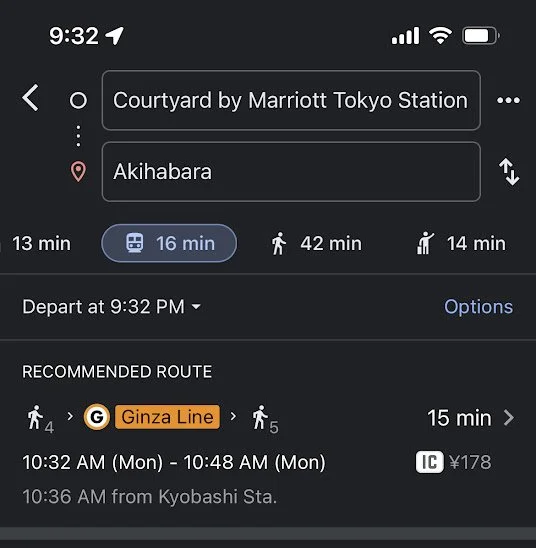
2.) Google Maps App: This works really well for getting around Japan. Because Japan’s train system is so punctual and efficient you can fully rely on Google Maps. Google Maps will show you the directions to walk to your train station, which platform to get on, how many stops, what time trains are leaving, how long the trip is, and where to exit for your destination.
The limitation with Google Maps is it always picks the most efficient route and doesn’t factor in which lines are operated by Japan Railways Group. In the picture above we see a route that is not part of the JR system. That is where the Japan Official Travel App comes in handy.
3.) Japan Official Travel App: While Google Maps should be your go to for getting around Japan, Japan Travel App is a great back up navigation app to cross reference Google Maps and ensure you are taking a rail line that accepts JR pass. With the Japan Travel App you can filter to “Japan Rail Pass” when searching for directions. So if you reference the Google Maps picture above it defaulted to the most efficient route without considering JR pass. Reference below and the Japan Travel App is making sure we take the most efficient route that accepts JR pass, this route is has a little longer walking time but overall about the same travel time.
4.) Suica Card: It’s important to get a Suica card and load it up with about 2000-5000 Yen depending on your itinerary. The Suica card is an important backup to have when you can’t find a reasonable route covered by JR pass, or for the days when your JR pass is not activated. For example, if the discrepancy in the example above between most efficient route vs most efficient route with JR pass was a considerable difference, then just use the Suica card and don’t waste too much time/effort. You can get a Suica card for free at the train stations and just load them up with Yen at the kiosks. The kiosks have English options. You can also use your Suica card at vending machines and most stores inside train stations
Closing thoughts: Japan train stations have an abundance of lockers for luggage storage. So if you have to check out of your hotel and aren’t going straight to your next hotel it is very easy and safe to store your luggage at the train station. I took advantage of this a couple times to maximize my time in Kyoto and Osaka. Certain stops in Tokyo during rush hour can be a little overwhelming, but since you read this you probably have done your research and you’ll be fine. I recommend familiarizing yourself with some key routes on your itinerary on the Google Maps App and Japan Travel App before arriving in Japan. Japan is one of those places where doing your homework and planning in advance will go a long way to maximize your time and aid in abiding to Japanese cultural etiquettes.


